
HOW TO TEST A GOLF CART SOLENOID

A solenoid is an electrical component that acts as a switch or a valve, typically operated electromagnetically. In a golf cart, the solenoid controls the flow of electrical current to various components, particularly the motor and the controller.
Here you will learn how to test a golf cart solenoid, its importance, and the steps to use a multimeter to test a golf cart solenoid.
Importance of Testing the Solenoid for Proper Functioning
Testing the solenoid is essential for several reasons:
- Performance and Efficiency: A properly functioning solenoid ensures that the golf cart operates smoothly and efficiently. It controls the movement of electricity from the batteries to the motor, allowing the cart to accelerate and maintain speed as needed.
- Safety: A faulty solenoid can cause unpredictable behavior in the golf cart, potentially causing accidents or damage to the vehicle. Regular testing helps identify issues early and prevent unsafe situations.
- Preventive Maintenance: Testing the solenoid is part of routine maintenance for a golf cart. Identifying any problems early on can avoid costly repairs or breakdowns during use.
- Diagnosis of Other Issues: Sometimes, symptoms of other electrical or mechanical problems in the golf cart may stem from a malfunctioning solenoid. Testing the solenoid can help rule out or identify it as contributing to other issues.
TOOLS REQUIRED TO TEST A GOLF CART SOLENOID
When testing a golf cart solenoid, you’ll need a few essential tools to perform the diagnostics effectively. Here’s a list:

- Multimeter: This is essential for measuring voltage, resistance, and continuity. Choose a digital multimeter that can handle DC voltage and resistance measurements.
- Basic Hand Tools:
- Screwdrivers: Both flathead and Phillips head screwdrivers for accessing the solenoid and other components.
- Pliers: Useful for gripping and manipulating wires or terminals.
- Wire Cutters/Strippers: These are used to cut and strip insulation from wires as needed.
- Socket Set: This set is used to remove bolts or nuts and secure the solenoid or other components if necessary.
- Safety Equipment:
- Safety Glasses: Protect your eyes from debris and potential sparks.
- Gloves: Provide protection and better grip when handling components.
- Inspection Light: A portable light source to illuminate the work area, especially when working in dimly lit conditions.
- Cleaning Supplies:
- Contact Cleaner: For cleaning electrical contacts and connections.
- Rags: To wipe down components and keep your work area clean.
- Service Manual or Wiring Diagram: Depending on the complexity of your golf cart model, having access to the service manual or wiring diagram can be invaluable for understanding the electrical system and troubleshooting effectively.
Having these tools readily available will make the process of testing and replacing a golf cart solenoid much smoother and more efficient.
Also Read:
WHAT STEPS SHOULD I TAKE TO TEST A GOLF CART SOLENOID WITH A MULTIMETER?
Testing a golf cart solenoid using a multimeter involves several steps to ensure accurate readings and proper diagnosis of the solenoid’s condition. Here’s a detailed guide on how to set up and use a multimeter correctly for this purpose:
Steps to Use a Multimeter to Test a Golf Cart Solenoid
1. Gather Your Tools:
- Multimeter (set to measure DC voltage and resistance)
- Basic hand tools (screwdrivers, pliers)
- Safety glasses and gloves (optional but recommended)
2. Preparation:
- Ensure the golf cart is turned off and parked on a flat, stable surface.
- Identify the solenoid location in the golf cart. It’s usually located near the battery compartment or the motor.
3. Set Up the Multimeter:
- Voltage Testing:
- Turn the multimeter dial to the DC voltage (V) setting. Typically, this will have a range selector for different voltage levels (e.g., 20V, 200V).
- If your multimeter requires it, insert the red probe into the VΩmA (volt-ohm-milliamp) port.
- Insert the black probe into the COM (common) port.
- Resistance Testing:
- Turn the multimeter dial to the resistance (Ω) setting. Depending on your multimeter, this might be labeled as Ω, ohms, or resistance.
- Insert the red probe into the VΩmA port.
- Insert the black probe into the COM port.
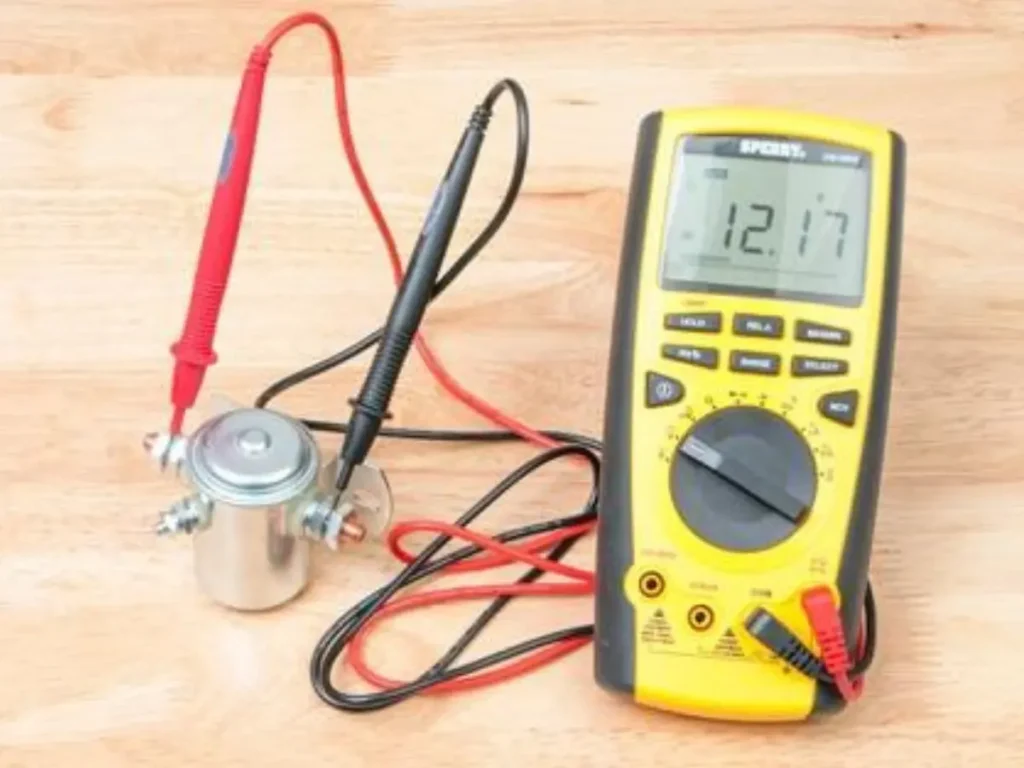
4. Voltage Testing:
- With the multimeter set to measure DC voltage:
- Positive Terminal: Place the red probe on the positive terminal of the solenoid.
- Negative Terminal: Place the black probe on the negative terminal of the solenoid.
- Reading: Turn on the golf cart key to the “on” position (do not start the cart). You should see a voltage reading on the multimeter display.
- Expected Voltage: Compare the reading to the specifications in your golf cart manual. If the solenoid is functioning correctly, you should typically see battery pack voltage (around 36V or 48V for most golf carts).
5. Resistance Testing:
- With the multimeter set to measure resistance:
- Disconnect Power: Ensure the golf cart is turned off.
- Isolate Solenoid: Disconnect any wires or cables attached to it to ensure you’re testing it independently.
- Probe Placement: Place the red probe on one solenoid terminal and the black probe on the other.
- Reading: Check the multimeter display for the resistance reading.
- Expected Resistance: Refer to your golf cart manual for the specific resistance range expected for your solenoid. Typically, a healthy solenoid shows low resistance (in ohms), indicating continuity.
6. Interpretation of Results:
- Voltage Test: If you do not see the expected voltage when the key is turned on or if the voltage fluctuates significantly, the solenoid may be faulty.
- Resistance Test: The solenoid may be faulty if the resistance reading is significantly higher or lower than the specified range or if there is no continuity (infinite resistance).
7. Documentation and Troubleshooting:
- Record your readings and compare them to the manufacturer’s specifications.
- If the readings are outside the normal range or indicate a problem, further troubleshooting or replacement of the solenoid may be necessary.
8. Safety Precautions:
- Always follow safety guidelines when working with electrical components.
- Ensure proper insulation of all connections to prevent short circuits or accidental shocks.
Following these steps, you can effectively use a multimeter to test a golf cart solenoid, diagnose potential issues, and take appropriate action to maintain or repair your golf cart’s electrical system.
Also Read: How Much Does An Electric Golf Cart Weigh
HOW DO I SET MY MULTIMETER TO CHECK THE SOLENOID’S RESISTANCE?
To check the resistance of a golf cart solenoid using a multimeter, follow these steps to set up your multimeter and interpret the results correctly:
Setting the Multimeter to Measure Resistance
- Turn Off Power: Ensure the golf cart is turned off and parked securely.
- Select Resistance (Ω) Setting:
- Turn the multimeter dial to the resistance (Ω) setting. This setting is usually denoted by the symbol Ω or the word “ohms.”
- Choose an appropriate range on the multimeter. If you need more clarification, start with the highest range and adjust accordingly for better accuracy.
- Insert Probes:
- Insert the red probe into the multimeter’s VΩmA (volt-ohm-milliamp) port.
- Insert the black probe into the COM (common) port.
Checking Solenoid Resistance
- Isolate Solenoid:
- If possible, disconnect any wires or cables connected to the solenoid to ensure you’re testing it independently.
- Probe Placement:
- Place the red probe on one terminal of the solenoid.
- Place the black probe on the other terminal of the solenoid.
- Read the Display:
- Look at the multimeter display to read the resistance value.
- The display will show the resistance in ohms (Ω).
Interpreting the Resistance Values
- Expected Resistance Values:
- Refer to your golf cart manufacturer’s specifications or service manual for the expected resistance range of the solenoid.
- Typical values can vary depending on the specific model and type of solenoid. Still, they generally range from a few ohms (e.g., 4-20 ohms) for low-current solenoids to higher values for larger solenoids.
- What Resistance Values Indicate:
- Normal/Healthy Solenoid: A healthy solenoid typically shows a consistent and relatively low resistance reading within the expected range. This indicates that the internal coil and contacts are intact and conducting electricity properly.
- Faulty Solenoid: If the resistance reading is significantly higher than expected (infinite resistance, OL on the multimeter), it indicates an open circuit within the solenoid coil. This could mean the coil has burned out or there is a break in the wiring.
- Shorted Solenoid: If the resistance reading is shallow (close to zero ohms), it indicates a short circuit within the solenoid coil, which could lead to overheating or failure.
HOW CAN I TELL IF THE SOLENOID IS FAULTY?
Identifying Faulty Solenoid
Identifying signs of a faulty solenoid in a golf cart is crucial for ensuring smooth operation and preventing potential breakdowns. Here are some common signs that indicate a solenoid might be faulty, along with troubleshooting tips:
Signs of a Faulty Solenoid
- No Movement When Key is Turned On: If the golf cart does not move when the key is turned on, it could indicate a problem with the solenoid not engaging to allow current flow to the motor.
- Intermittent Starting Issues: Difficulty starting the golf cart intermittently, where it sometimes starts and sometimes doesn’t, can be a sign of a solenoid that is failing to engage or disengage consistently.
- Clicking Sound Without Movement: When you turn the key to start the golf cart if you hear a clicking sound coming from the solenoid but the cart doesn’t move, it suggests that the solenoid may be clicking but not allowing sufficient current flow to the motor.
- Jerky or Inconsistent Movement: If the golf cart moves in a jerky manner or the speed is inconsistent, it could indicate that the solenoid is not providing consistent current flow to the motor.
- Overheating or Burnt Smell: A solenoid overheating due to internal resistance issues or short circuits may emit a burnt smell or feel excessively hot to the touch.
Troubleshooting Tips
- Inspect Connections: Check the wiring and connections to the solenoid for any signs of corrosion, loose connections, or damage. Clean and tighten connections as necessary.
- Test Voltage: Use a multimeter to test the voltage across the solenoid terminals when the key is turned on. Compare the reading to the battery voltage. A significant voltage drop could indicate a faulty solenoid.
- Check for Continuity: Use a multimeter to perform a continuity test to check if there is continuity (low resistance) across the solenoid terminals when it should be engaged. An open circuit (infinite resistance) indicates a problem.
- Inspect Solenoid Condition: Physically inspect the solenoid for any signs of physical damage, such as cracks, burns, or corrosion. Replace the solenoid if any damage is found.
- Bench Test the Solenoid: Disconnect the solenoid from the golf cart and bench test it using a 12V power source (if applicable) to see if it engages properly. Ensure it clicks audibly and allows current to flow through when activated.
- Consult Service Manual: Refer to the golf cart’s service manual or wiring diagram for specific troubleshooting steps and resistance values expected for the solenoid.
WHAT VOLTAGE SHOULD I EXPECT WHEN TESTING THE SOLENOID?
When testing a solenoid in a golf cart, the voltage you should expect to see across its terminals depends on the system voltage of your golf cart. Most golf carts operate on either a 36-volt or 48-volt system. Here’s what you can generally expect:
- For a 36-Volt System:
- When the key is turned on and the solenoid is activated (engaged), you should expect to see a voltage reading close to 36 volts across the solenoid’s terminals.
- For a 48-Volt System:
- Similarly, when engaged in a 48-volt system, you should expect to measure around 48 volts across the solenoid terminals.
Voltage Testing Procedure
- Use a multimeter set to measure DC voltage (V).
- Place the red probe on the positive terminal of the solenoid.
- Place the black probe on the negative terminal of the solenoid.
- Turn the “on” key (without starting the cart) to activate the solenoid.
- Check the multimeter display for the voltage reading.
Interpretation
- Expected Voltage Reading: The voltage reading should be close to the system voltage of your golf cart (36V or 48V). This indicates that the solenoid is allowing current to pass through when activated.
- Significance: If the voltage reading is significantly lower than the system voltage or fluctuates when the solenoid is activated, it may indicate a problem with the solenoid not entirely engaging or internal resistance issues.
Note:
- It’s essential to consult your golf cart’s specific service manual or wiring diagram for precise voltage specifications, as different models and manufacturers may have slightly different operating voltages or configurations.
- If you notice a voltage significantly lower than expected or inconsistent readings, further troubleshooting, such as checking connections, testing for continuity, or bench testing the solenoid, may be necessary to determine the root cause.
HOW TO TELL IF A GOLF CART SOLENOID IS BAD?
Determining if a golf cart solenoid is bad involves observing specific symptoms and conducting diagnostic tests. Here are several indicators and steps to help you identify a faulty solenoid:
Signs that a Golf Cart Solenoid Might Be Bad
- No Movement When Key is Turned On:
- If the golf cart does not move when the key is turned on, it could indicate that the solenoid is not allowing current to flow to the motor.
- Clicking Sound Without Movement:
- When you turn the key to start the golf cart, if you hear a clicking sound coming from the solenoid but the cart doesn’t move, it suggests that the solenoid is clicking but not fully engaging or allowing sufficient current flow.
- Intermittent Starting Issues:
- Difficulty starting the golf cart intermittently, where it sometimes starts and sometimes doesn’t, can be a sign of a solenoid failing to engage consistently.
- Jerky or Inconsistent Movement:
- If the golf cart moves in a jerky manner or the speed is inconsistent, it could indicate that the solenoid is not providing consistent current flow to the motor.
- Overheating or Burnt Smell:
- A faulty solenoid, caused by internal resistance issues or short circuits, may emit a burnt smell or feel excessively hot to the touch.
Diagnostic Steps
To confirm if the solenoid is wrong, you can perform the following diagnostic tests:
- Visual Inspection:
- Inspect the solenoid for any physical damage, such as cracks, burns, or corrosion. These signs may indicate internal problems that affect its operation.
- Voltage Test:
- When the key is turned on, a multimeter tests the voltage across the solenoid terminals. Compare the reading to the system voltage of your golf cart (e.g., 36V or 48V). A significantly lower voltage reading or fluctuations may indicate a problem with the solenoid.
- Resistance Test:
- Perform a resistance test using a multimeter to check continuity across the solenoid’s terminals. A high resistance reading (infinite resistance or open circuit) indicates that the solenoid coil may be damaged or disconnected internally.
- Bench Test:
- Disconnect the solenoid from the golf cart, and bench test it using a 12V power source (if applicable) to see if it engages properly. Listen for an audible click and ensure it allows current to flow through when activated.
- Consultation with a Technician:
- If you need clarification on performing these tests or interpreting the results, consider seeking assistance from a qualified technician who specializes in golf cart electrical systems.
IS THE CLUB CAR PRECEDENT WIRING DIAGRAM AFFECT THE SOLENOID VALVE?
The Club Car Precedent wiring diagram is critical in understanding and troubleshooting the solenoid valve within the golf cart’s electrical system. The wiring diagram visually represents how the various components, including the solenoid valve, are interconnected and powered. It illustrates the specific wiring paths, connections, and voltage requirements that ensure the solenoid valve operates correctly.
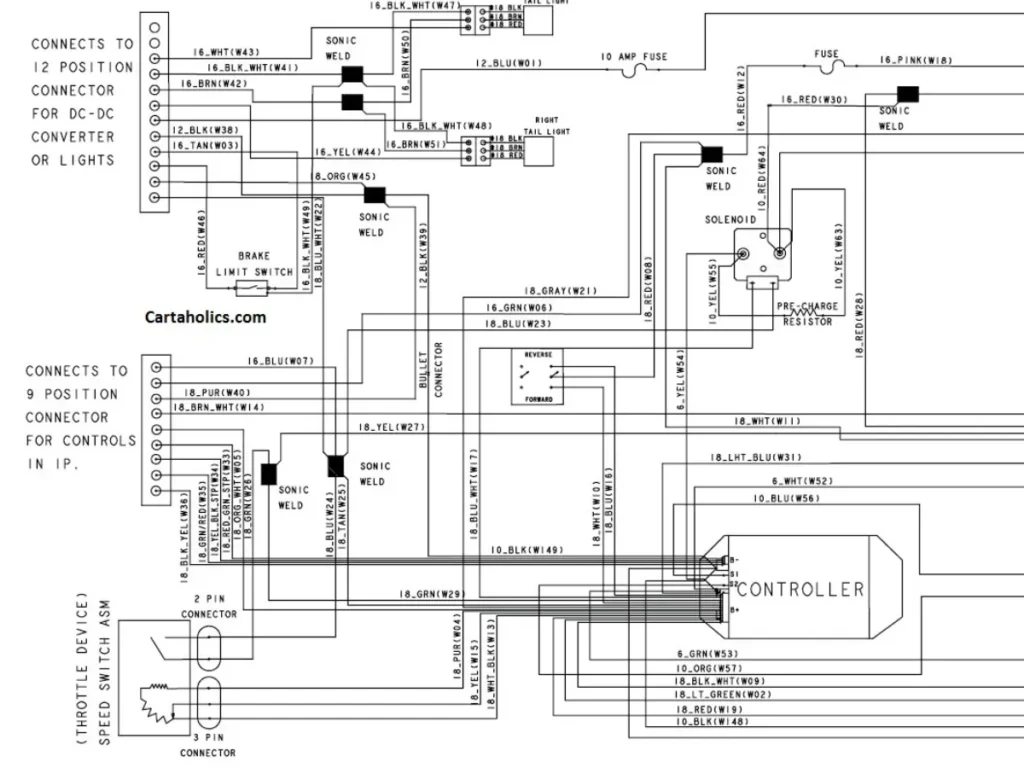
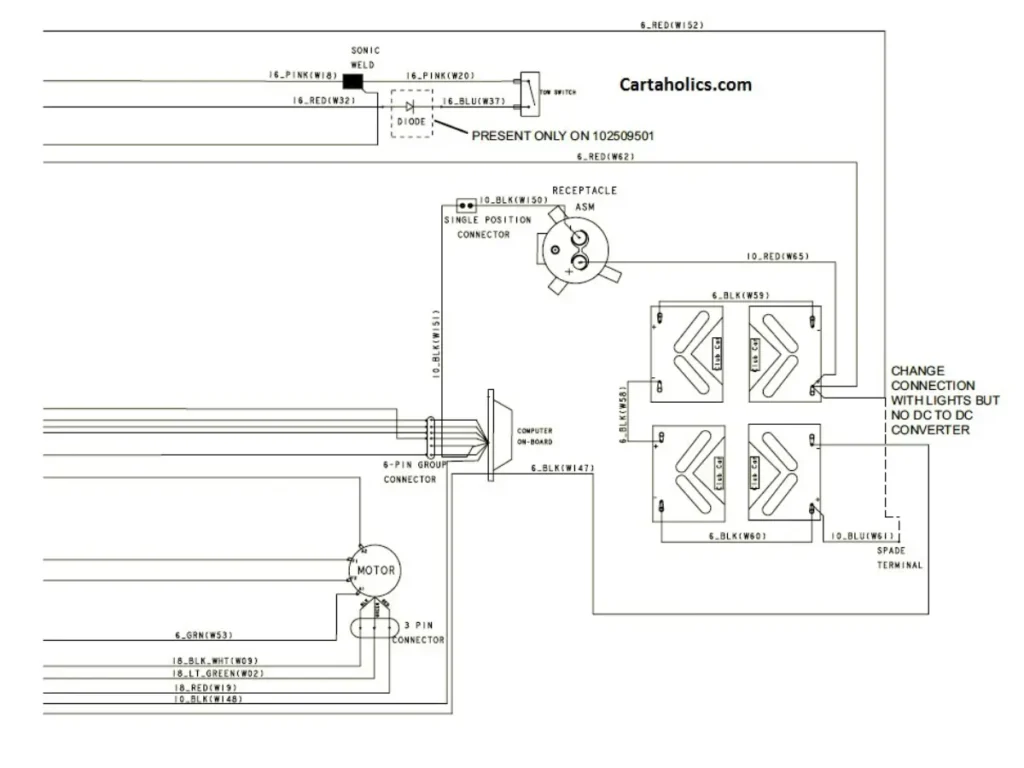
Understanding this diagram is essential because any discrepancies or faults in the wiring can directly impact the solenoid valve’s performance. Issues such as improper connections, short circuits, or incorrect voltage supply, as depicted in the wiring diagram, can lead to malfunctioning of the solenoid valve, causing symptoms like failure to engage properly or erratic operation.
Therefore, referencing and correctly interpreting the Club Car Precedent wiring diagram is crucial for diagnosing solenoid valve issues and ensuring the overall reliability and functionality of the golf cart’s electrical system.
CAN YOU REPLACE THE SOLENOID ON A GOLF CART?
Yes, you can replace the solenoid on a golf cart. The solenoid is a replaceable component that is crucial in controlling the electrical current flow from the battery pack to the motor, enabling the golf cart to start and operate. Here are the general steps involved in replacing a solenoid on a golf cart:
- Identify the Solenoid Location: Locate the solenoid in your golf cart. It is typically situated near the battery compartment or close to the controller.
- Turn Off Power: To prevent electrical accidents, ensure the golf cart is turned off and the key is removed.
- Disconnect Battery: Disconnect the battery’s negative terminal to avoid any accidental electrical contact during the replacement process.
- Remove Wires: Note the existing wiring connections to the solenoid. Carefully remove these wires from the solenoid terminals. Take a photo or make a diagram to remember the correct wiring configuration.
- Remove Old Solenoid: Use appropriate tools (such as a wrench or socket set) to remove the mounting bolts securing the solenoid to the golf cart frame or bracket. Note the mounting orientation.
- Install New Solenoid: Position and secure the new solenoid using the mounting bolts. Ensure it is firmly attached to the frame or bracket.
- Connect Wires: Attach the wires to the appropriate terminals on the new solenoid, following the diagram or photo you took earlier to ensure correct placement.
- Reconnect Battery: Reconnect the negative terminal of the battery.
- Test Operation: Turn on the key and test the golf cart’s operation. Listen for the solenoid click when the key is turned on, indicating that it is engaging properly.
- Final Checks: Double-check all connections and ensure no loose wires or connections. Test the golf cart for proper function, including acceleration and braking.
HOW MANY OHMS SHOULD A GOLF CART SOLENOID HAVE?
A golf cart solenoid should typically have a resistance reading ranging from approximately 4 to 20 ohms. This range can vary slightly depending on the specific model and manufacturer specifications. Checking the solenoid’s resistance with a multimeter helps ensure it is within this normal operating range, indicating proper functionality.
Troubleshooting Common Issues
Troubleshooting common issues related to a golf cart solenoid involves addressing specific symptoms and understanding their potential causes:
- GOLF CART SOLENOID NOT CLICKING:
- Possible Causes: This issue typically indicates a lack of electrical activation of the solenoid. It could stem from a faulty key switch, a wiring issue (such as loose or corroded connections), a blown fuse, or a malfunctioning controller.
- Troubleshooting Steps:
- Check the key switch and ensure it is functioning correctly.
- Inspect all wiring connections to the solenoid for tightness and corrosion.
- Test relevant fuses and replace any that are blown.
- Use a multimeter to verify if the voltage reaches the solenoid when turning the key on.
- ELECTRIC GOLF CART BAD SOLENOID SYMPTOMS:
- Symptoms: Symptoms of a bad solenoid can include intermittent starting issues, the golf cart not moving when the key is turned on, or jerky and inconsistent movement.
- Possible Causes: A faulty solenoid may have internal electrical faults such as a burned-out coil, short circuits, or mechanical issues preventing proper engagement.
- Troubleshooting Steps:
- Perform a voltage test across the solenoid terminals to check for proper activation and voltage drop.
- Conduct a resistance test to ensure the solenoid’s coil is within the specified ohm range.
- Bench test the solenoid using a 12V power source to see if it engages audibly and adequately clicks.
- GOLF CART SOLENOID CLICKS BUT DOES NOT MOVE:
- Possible Causes: When the solenoid clicks audibly but the golf cart does not move, it suggests that it may not allow sufficient current flow to the motor. This could be due to dirty or corroded contacts within the solenoid, worn-out contacts, or insufficient voltage reaching the solenoid.
- Troubleshooting Steps:
- Inspect and clean the contacts inside the solenoid to ensure a good electrical connection.
- Verify that the voltage at the solenoid terminals matches the golf cart’s system voltage (e.g., 36V or 48V).
- Check the battery pack voltage and ensure it is adequate for proper solenoid operation.
- Replace the solenoid if cleaning and testing indicate internal faults preventing proper current flow.
By systematically troubleshooting these common issues associated with golf cart solenoids, you can identify the root cause of the problem and take appropriate steps to repair or replace components as needed, ensuring the reliable operation of your electric golf cart.
Conclusion:
Troubleshooting a golf cart solenoid involves testing for proper voltage and resistance using a multimeter. Symptoms such as the solenoid not clicking or clicking but not engaging can indicate issues with wiring, internal faults, or insufficient voltage. Proper diagnosis and replacement, if necessary, ensure the reliable performance of the golf cart’s electrical system.
FAQ
HOW TO TEST A 36-VOLT GOLF CART SOLENOID?
Set your multimeter to measure DC voltage to test a 36-volt golf cart solenoid. With the key turned on, probe the solenoid’s terminals. If the solenoid functions correctly, you should see approximately 36 volts across the terminals.
HOW TO TEST A 48 VOLT GOLF CART SOLENOID?
Similarly, for a 48-volt golf cart solenoid, use your multimeter set to DC voltage. Turn on the key and measure the voltage across the solenoid terminals. If the solenoid is operational, expect to see around 48 volts.
HOW TO TEST A GOLF CART SOLENOID WITH A MULTIMETER?
Set your multimeter to measure DC voltage. With the key turned on, place the red probe on the positive terminal and the black probe on the negative terminal of the solenoid. Check the multimeter display for the voltage reading. Also, switch to resistance mode to check continuity across the solenoid terminals.
HOW DO I KNOW IF MY GOLF CART SOLENOID IS BAD?
Signs of a wrong golf cart solenoid include the cart not moving when the key is turned on, intermittent starting issues, or clicking sounds without movement. A multimeter test determines proper voltage and resistance across the solenoid terminals. Abnormal readings or no continuity indicate potential solenoid issues.
HOW TO TEST A GOLF CART SOLENOID EZGO?
Testing an EZGO golf cart solenoid follows the same principles as testing other golf cart solenoids. A multimeter is used to measure voltage and resistance across the solenoid terminals. For accurate testing procedures, refer to EZGO’s specific wiring diagrams and voltage specifications.

I am a content writer and affiliate marketer with a passion for crafting engaging and informative content that drives traffic and sales. With years of experience in the industry, I have honed my skills in SEO, social media marketing, and email marketing to help businesses reach their target audience and achieve their goals.